在阿里巴巴的Java开发手册中看到了线程池比较推荐使用ThreadPoolExecutor,于是每次也都是照葫芦画瓢地使用,对于其中的参数(corePoolSize, maximumPoolSize,keepAliveTime , workQueue)等完全靠着yy去使用。每次用的是时候都感觉心慌慌的,总算是找了个时间来真正地去阅读其源码。
四个主要参数 在使用ThreadPoolExecutor的时候,我们通常会使用它的如下构造函数,(此处未考虑拒绝策略)
1 2 3 4 5 ThreadPoolExecutor(int corePoolSize, int maximumPoolSize, long keepAliveTime, TimeUnit unit, BlockingQueue<Runnable> workQueue)
在这里主要有四个参数:核心线程池大小、最大线程池大小、存活时间、工作队列。其实看到这四个参数我是很懵的,比如,核心线程池与最大线程池之间的区别、工作队列又是用来做什么的,存活时间指的是谁的存活时间。在讲解源码之前不妨猜猜。
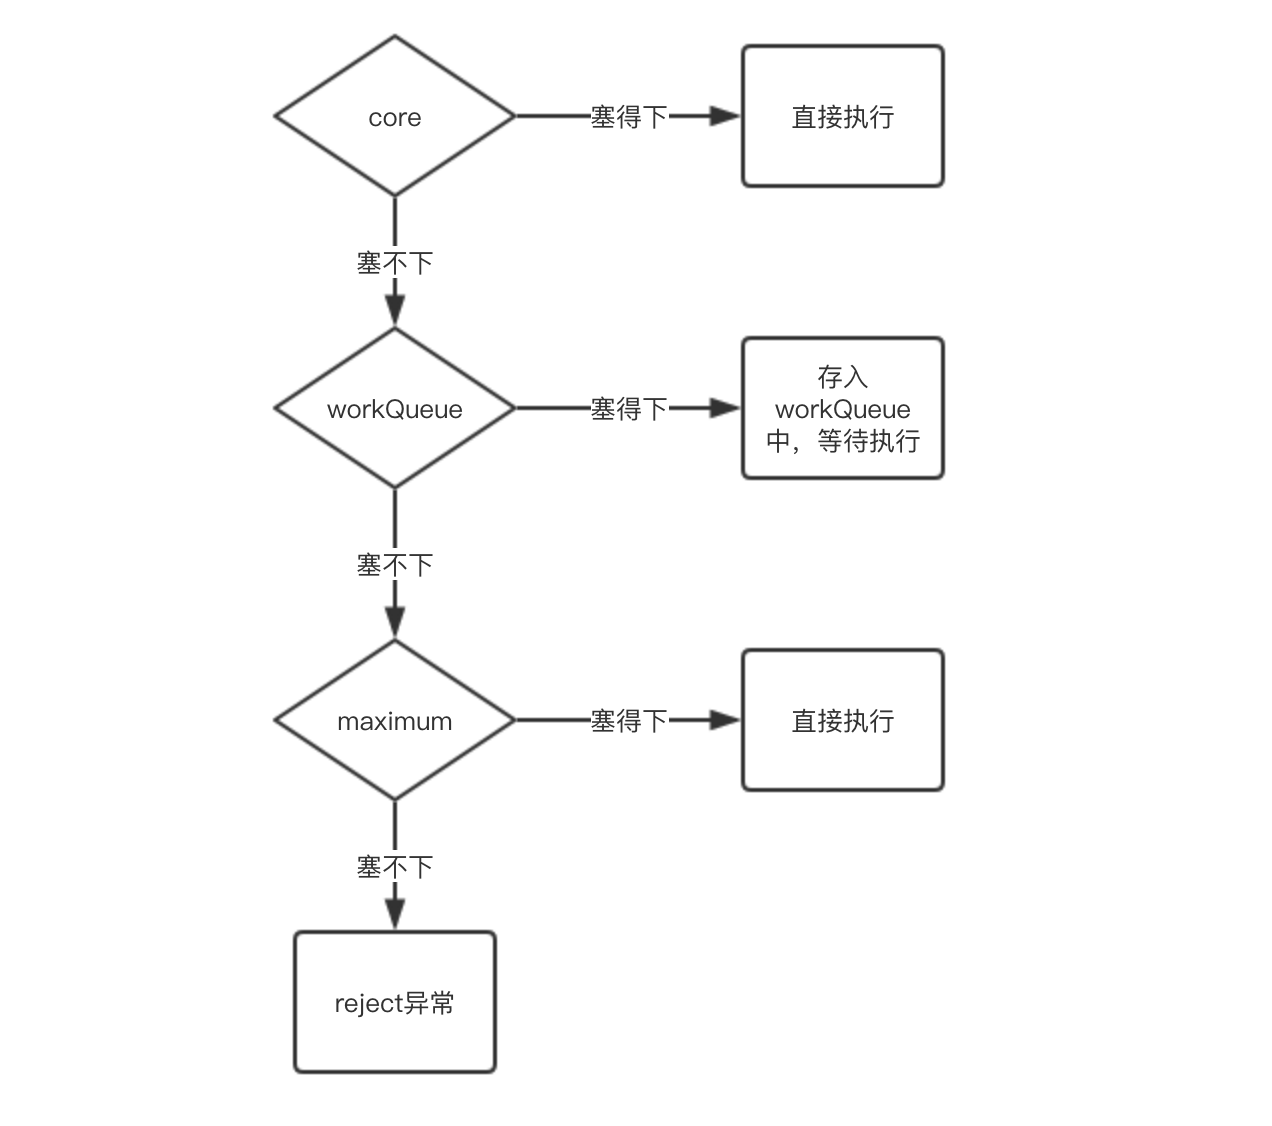
流程总览
这个流程粗看没太大问题,但是有一块一方却异常突兀、反常识,就是workQueue和maximum的顺序,在我的想象中应该是先maximum再workQueue。但是事实上的确是先workQueue,再maximum。可以尝试运行下面这段demo,
1
2
3
4
5
6
7
8
9
10
11
12
13
14
15
16
17
public class ThreadPoolExecutorMain private static final ThreadPoolExecutor pool = new ThreadPoolExecutor(1 , 3 , 30 , TimeUnit.SECONDS, new LinkedBlockingQueue<>(10 )); public static void main (String[] args) for (int i = 1 ; i <= 20 ; i++) { final int tmp = i; pool.execute(() -> { try { Thread.sleep(5000 ); System.out.println(tmp); } catch (InterruptedException e) { e.printStackTrace(); } }); } } }
在这段demo中,不发生意外的时候,执行顺序为(1,12,13),(2,3,4),(5,6,7),(8,9,10),11,每组内部顺序可以混乱。(注意:在真正使用的时候,我们需要将ThreadPoolExecutor当作无序的使用)
源码解析 execute() 首先直接看execute()方法的源码
1
2
3
4
5
6
7
8
9
10
11
12
13
14
15
16
17
18
19
20
21
22
public void execute (Runnable command) if (command == null ) throw new NullPointerException(); int c = ctl.get(); if (workerCountOf(c) < corePoolSize) { if (addWorker(command, true )) return ; c = ctl.get(); } if (isRunning(c) && workQueue.offer(command)) { int recheck = ctl.get(); if (! isRunning(recheck) && remove(command)) reject(command); else if (workerCountOf(recheck) == 0 ) addWorker(null , false ); } else if (!addWorker(command, false )) reject(command); }
在这里ctl是一个设计非常精巧的状态管理器,它其实是一个AtomicInteger,它利用int的前三位来存储当前线程池的状态(RUNNING、SHUTDOWN、STOP、TIDYING、TERMINATED),后29位用来存储线程数量。
在这段代码中,我们可以看到对线程的执行策略分为了三个部分:1. core部分 2. workQueue部分 3. max部分。其中workQueue部分比较直观,就是直接调用workQueue.offer(command)将线程加入了待执行队列。那么接下来需要关注的是addWorker()方法。
addWorker() 1 2 3 4 5 6 7 8 9 10 11 12 13 14 15 16 17 18 19 20 21 22 23 24 25 26 27 28 29 30 31 32 33 34 35 36 37 38 39 40 41 42 43 44 45 46 47 48 49 50 51 52 53 54 55 56 57 58 59 60 61 62 63 private boolean addWorker (Runnable firstTask, boolean core) retry: for (;;) { int c = ctl.get(); int rs = runStateOf(c); if (rs >= SHUTDOWN && ! (rs == SHUTDOWN && firstTask == null && ! workQueue.isEmpty())) return false ; for (;;) { int wc = workerCountOf(c); if (wc >= CAPACITY || wc >= (core ? corePoolSize : maximumPoolSize)) return false ; if (compareAndIncrementWorkerCount(c)) break retry; c = ctl.get(); if (runStateOf(c) != rs) continue retry; } } boolean workerStarted = false ; boolean workerAdded = false ; Worker w = null ; try { w = new Worker(firstTask); final Thread t = w.thread; if (t != null ) { final ReentrantLock mainLock = this .mainLock; mainLock.lock(); try { int rs = runStateOf(ctl.get()); if (rs < SHUTDOWN || (rs == SHUTDOWN && firstTask == null )) { if (t.isAlive()) throw new IllegalThreadStateException(); workers.add(w); int s = workers.size(); if (s > largestPoolSize) largestPoolSize = s; workerAdded = true ; } } finally { mainLock.unlock(); } if (workerAdded) { t.start(); workerStarted = true ; } } } finally { if (! workerStarted) addWorkerFailed(w); } return workerStarted; }
addWorker()这段代码看起来比较复杂,但是如果去除掉一些细节和并发安全相关的代码,整体的代码逻辑就是判断线程是否可以执行,如果可以执行则新建线程执行。在这段代码中,我们可以看到我们的线程被封装到了一个叫做Worker的类中,接下来,我们继续探究Worker的源码。
Worker 在上面的代码中我们可以看到Worker的执行是通过worker.thread.start()来执行的,先看一下构造函数。
1
2
3
4
5
Worker(Runnable firstTask) { setState(-1 ); this .firstTask = firstTask; this .thread = getThreadFactory().newThread(this ); }
这里面Worker又作为了Runnable参数传给了Worker.thread。那接下来看run()方法
1
2
3
4
5
6
7
8
9
10
11
12
13
14
15
16
17
18
19
20
21
22
23
24
25
26
27
28
29
30
31
32
33
34
35
36
37
38
39
40
41
42
43
public void run () runWorker(this ); } final void runWorker (Worker w) Thread wt = Thread.currentThread(); Runnable task = w.firstTask; w.firstTask = null ; w.unlock(); boolean completedAbruptly = true ; try { while (task != null || (task = getTask()) != null ) { w.lock(); if ((runStateAtLeast(ctl.get(), STOP) || (Thread.interrupted() && runStateAtLeast(ctl.get(), STOP))) && !wt.isInterrupted()) wt.interrupt(); try { beforeExecute(wt, task); Throwable thrown = null ; try { task.run(); } catch (RuntimeException x) { thrown = x; throw x; } catch (Error x) { thrown = x; throw x; } catch (Throwable x) { thrown = x; throw new Error(x); } finally { afterExecute(task, thrown); } } finally { task = null ; w.completedTasks++; w.unlock(); } } completedAbruptly = false ; } finally { processWorkerExit(w, completedAbruptly); } }
这段run()方法可以看到ThreadPoolExecutor是通过不停地getTask()来复用线程的,但是到这里,其实我还有一个疑问,就是ThreadPoolExecutor如何保持线程一直处于存活状态的。那这个问题同样通过源码来继续解读。
getTask() 1 2 3 4 5 6 7 8 9 10 11 12 13 14 15 16 17 18 19 20 21 22 23 24 25 26 27 28 29 30 31 32 33 34 35 36 37 private Runnable getTask () boolean timedOut = false ; for (;;) { int c = ctl.get(); int rs = runStateOf(c); if (rs >= SHUTDOWN && (rs >= STOP || workQueue.isEmpty())) { decrementWorkerCount(); return null ; } int wc = workerCountOf(c); boolean timed = allowCoreThreadTimeOut || wc > corePoolSize; if ((wc > maximumPoolSize || (timed && timedOut)) && (wc > 1 || workQueue.isEmpty())) { if (compareAndDecrementWorkerCount(c)) return null ; continue ; } try { Runnable r = timed ? workQueue.poll(keepAliveTime, TimeUnit.NANOSECONDS) : workQueue.take(); if (r != null ) return r; timedOut = true ; } catch (InterruptedException retry) { timedOut = false ; } } }
在这段代码中我们可以看到此处利用workQueue是阻塞队列的特性来保持core线程一直处于存活状态(workQueue.take),max线程超时消亡(workQueue.poll)。当然在这段代码中,我们发现也可以通过设置ThreadPoolExecutor的allowCoreThreadTimeOut来使得core线程超时消亡。至于workQueue的内部实现(take和poll)此处就不继续深究下去了。
总结 至此,我们已经知道了ThreadPoolExecutor的整体执行流程以及常用参数的意义,同样也清楚了流程总览中的demo代码的执行结果为何具有顺序性。至于workQueue内部的实现就留到下一次,初步看了一下,感觉其内部也有很多非常有意思的东西。